Collection thread of learning/example workflows for beginners

Questions and answers on how to get the most out of FFAStrans
emcodem
Posts: 1643
Joined: Wed Sep 19, 2018 8:11 am

Collection thread of learning/example workflows for beginners

Post by emcodem »

Hi,

this is a collection thread for some "learning" worfklows for unexperienced users.
As the forum allows only 2 attachments/links per topic, i'll add each example in an answer here. I'll add a download link to a collection/zip file here once it is time for it.
Please do not reply to this thread, but open a new topic if you have any questions for one of the workflows.

Users:
Import the workflow xml and find it in the workflow folder of ffastrans: developer_workflow_tutorials or API related stuff in developer_API_tutorials.
Please test the workflows by submitting very short/small files.

Workflow developers:
In case you have to add something (which would be great), please make sure your workflow is so generic that it can be imported and used on a "newbies" installation. Design your workflow in a way that it explains what it does for a totally unexperienced user. If you are unsure about your workflow is worthy to be posted here, you can always PM me, admin or momocampo :-)
-) Please use c:\temp for writing any files
-) Please make sure you develop and export the workflow from this workflow-folder: developer_workflow_tutorials - users should see and find all example workflows in this folder.

Wanted workflows (list of stuff i'd love someone to create or that i will create over time), sorted by importance from my perspective:

-) processors: how to use the monitor (watchfolder) processor
-) processors: how to use the populate variables processor
-) processors: how to use the conditional processor
-) processors: how to use the hold processor
-) processors: how to use the commandline processor
-) processors: how to use the A/V decoder processor
-) processors: how to use the custom avisynth processor
-) processors: how to use the loudness processor

Cheers,
H
Last edited by emcodem on Thu Mar 07, 2019 10:00 pm, edited 12 times in total.
emcodem, wrapping since 2009 you got the rhyme?
emcodem
Posts: 1643
Joined: Wed Sep 19, 2018 8:11 am

Example workflow: What is %s_source%

Post by emcodem »

This workflow explains how important the inbuilt variable %s_souce% is. After each step, the value of %s_source% is written/appended to c:\temp\s_source.txt
Use it by just submitting some small video file to the "Start" node.
Attachments
What is the s_source variable.xml
(15.47 KiB) Downloaded 599 times
emcodem, wrapping since 2009 you got the rhyme?
emcodem
Posts: 1643
Joined: Wed Sep 19, 2018 8:11 am

Example Workflow: working with split into branches and what "merging" back to one branch actually does

Post by emcodem »

This workflow explains how "split and merge" operations in ffastrans work.

A "split" is called a "child job" or branch. In ffastrans, whenever you split into multiple branches, you actually generate a totally separate job that you can watch in the job monitor.

This example splits 2 times, ending up in 16 jobs.
To play around, it is best to first try it as it is, then insert hold nodes where you like and after all get out how the variables %s_splitid% and %s_subsplit_id% work.

This job uses the following user variables:
%s_outputfolder%: set to c:\temp at the main job before we split up. This way, the variable can be used in all splits.
%s_splitid%: after splitting up into 2 jobs, this variable carries the value 1 in the first job and 2 in the second job.
%s_subsplit_id%: after splitting up into 4 jobs (but visually only 2!), this variable carries value 1 or 2 for subjob 1 of mainjob 1 or subjob 2 of mainjob 1 etc...
Working with Split and Merge.xml
(36.09 KiB) Downloaded 533 times

Webinterface displays the number of executions per node:
split_and_merge.png
split_and_merge.png (139.73 KiB) Viewed 5563 times
After understanding this, you should actually understand why these 2 workflows are actually doing exactly the same thing and also that both of them end up in 4 jobs on the "job monitor":
workflows_equal.png
workflows_equal.png (45.22 KiB) Viewed 21885 times
emcodem, wrapping since 2009 you got the rhyme?
emcodem
Posts: 1643
Joined: Wed Sep 19, 2018 8:11 am

Example Workflow: working with user variables

Post by emcodem »

After importing the workflow, select it in your workflow list and rightclick-> submit file at the first node.
It will copy the file you submitted to c:\temp (if the folder exists).

This workflow shows how to use user variables and build a path from 2 variables:

The first processor "Populate Variables" is used to set the value of these 2 variables: %s_test_variable_1% and %s_test_variable_2%.
In the deliver to folder processor, the actual folder for delivery looks like this:

Code: Select all

%s_test_variable_1%:\%s_test_variable_2%
Which at workflow runtime will actually be translated to this:

Code: Select all

c:\temp
Please play with the values, set different drive letter and folder names for experimenting.
Working with User Variables.xml
(9.99 KiB) Downloaded 504 times

Detailed Explaination about User Variables:
  • You can create/delete User variables in every processor node by clicking the bold > Symbol
  • Just creating a user variable does not influence anything, it must be actually "used" in a processor in order to do something
  • Variable Values have to be set by a job. At job start, user variables are always empty. (see STATICS for pre-defined/global variables)
  • The same Variable can be set/used in multiple paralell job, they will not influence each other. A user variable only counts for the currently running job and its childs
  • If you use a non-set variable in a job, it's value is not replaced by "nothing", but it will appear as %s_some_variable_name%
  • Variable values are only visible to the current split/branch/job (it is all the same) and all child splits/branches/jobs
  • Once you created a variable, you can select it from the list in every processor of every workflow. But remember, it's value is empty by default when a job starts
  • Read about global variables (STATICS) in the next tutorial
emcodem, wrapping since 2009 you got the rhyme?
emcodem
Posts: 1643
Joined: Wed Sep 19, 2018 8:11 am

Example Workflow: working with STATICS vs Variables

Post by emcodem »

This workflow shows whats the difference between a variable and a STATIC.
Working with Statics VS Variables.xml
(10.1 KiB) Downloaded 466 times
In difference to user "variables", once created and set to a value, STATICS have always the same value in every workflow, job and split. The value can only be changed by an administrator using the ffastrans UI. A job cannot change the value of a STATIC. In other words, we talk about a global (or domain) variable here.

How to create a STATIC:

1) Left Click the header of a processor (does not have to be Populate variables, could by any processor)
2) left click one of the > Symbols
3) rickt click here and select -> New
4) Select the type "static" instead of variable
5) enter a name for this global STATIC variable. Remember, this value is always the same in each and every workflow that uses this STATIC.
6) select the type (advanced users can use something different than string)
7) enter a value for the static. Note again that this value cannot be changed by a job

Create_static.png
Create_static.png (63.83 KiB) Viewed 21861 times
emcodem, wrapping since 2009 you got the rhyme?
emcodem
Posts: 1643
Joined: Wed Sep 19, 2018 8:11 am

Example Workflow: working with numbers

Post by emcodem »

This workflow shows how to do some calculations with variables of type "Integer" (=Number, not text).
Working_with_numbers.xml
(7.7 KiB) Downloaded 449 times
    If you investigate the "Populate Variables" processor, you will see that it does the following calculation:

    Code: Select all

    $round(%i_height%/2)
    In words we do a devision by 2 here.
    • $round is an internal function for calculation in ffastrans. It rounds a number to the next full number in case this is neccessary. Otherwise the number is not changed at all.
    • %i_height% is a built-in variable set by ffastrans. If your input file has height 1080, the value of this variable is 1080. Note that this variable will change whenever a new file is produced by the workflow, e.g. after scaling, encoding, etc...
    • "/" is just the mathematical arithmetic operator for devision. Actually it goes back to core arithemtical functions of the programming language of ffastrans "Autoit". Supported are + - * / and ^ for square
    • 2 is a number that myself as the ffastrans administrator "hardcoded" into the workflow, it's value will never change, it is just always 2
    If you investigate the H264 node, and check top left the "Video size" , you will notice that there are the variables %i_half_width% and %i_half_height% used here. These variables have been set by the processor before, their value is the input video size by 2 ;-)
    emcodem, wrapping since 2009 you got the rhyme?
    emcodem
    Posts: 1643
    Joined: Wed Sep 19, 2018 8:11 am

    Example Workflow: Error handling

    Post by emcodem »

    This workflow is demonstrating how to catch and resolve errors.
    It first tries to deliver the input file to a share that actually does not exist. (wait a while, it will retry 100 times). When it fails, it will deliver to a fallback location. After that, we use a hold node with "synchronize" option in order to be able to go on with the main branch.
    Working with Errors.xml
    (8.04 KiB) Downloaded 438 times
    I guess this is a little known but very powerful feature of ffastrans workflows. Right click the input connector of a processor to select if the processor is executed on success, error or in any case.
    execute_on_error.png
    execute_on_error.png (7.03 KiB) Viewed 21840 times
    emcodem, wrapping since 2009 you got the rhyme?
    emcodem
    Posts: 1643
    Joined: Wed Sep 19, 2018 8:11 am

    API Example: how to cut a video with in and outpoint

    Post by emcodem »

    This workflow shows how to submit user variables "s_inpoint_frames" and "s_outpoint_frames" to a job, which uses the variables in a custom avisynth processor to cut the clip. As usual in my examples, the delivery is set to c:\temp in the delivery processor.
    Api_Set_In_outpoint.xml
    (11.82 KiB) Downloaded 505 times
    How to use:
    First check if the workflow works for you by submitting a file to the "Populate variables" processor manually (rightclick->submit file).
    If this works, and you are ready to try it using API, it is best to delete the populate variables processor before you go on.

    How the "cutting" works:
    Avisynth does the cutting actually using the ffms2 source plugin. Format support and frame accuracy are somewhat "flaky". It might not work on "any" media file (virtually no software can do this on "any" format and codec). Before using in production, make sure all your format/codec/audio configurations work using that technique.

    Example request:
    POST to http://localhost:65445/api/json/v1/jobs/

    Code: Select all

    {"wf_id":"20190112103244","start_proc":"dec_avmedia 20190307-220356-691-7431609b65e5","inputfile":"D:\\10s.mov","variables":[{"name":"s_inpoint_frames","content":"5"},{"name":"s_outpoint_frames","content":"30"}]}
    Using the new webinterface, you can easily test the API call and watch how it works:
    inoutpoint.png
    inoutpoint.png (271.37 KiB) Viewed 21817 times

    CHANGES SINCE FFASTRANS 1.0

    The Job Submit URL changed to http://localhost:65445/api/v2/jobs/

    Workflow for FFAStrans 1.0:
    Api_Set_In_outpoint1.0.json
    (4.53 KiB) Downloaded 335 times
    POST Body example:

    Code: Select all

    {"wf_id":"20190112103244","start_proc":"20190307-221246-572-77965af7e3e1","inputfile":"c:\\temp\\1.mov","variables":[{"name":"s_inpoint","data":"2"},{"name":"s_outpoint","data":"4"}]}
    emcodem, wrapping since 2009 you got the rhyme?
    emcodem
    Posts: 1643
    Joined: Wed Sep 19, 2018 8:11 am

    Extracting created ffmpeg command

    Post by emcodem »

    Whenever a built-in processor is not able to fulfill your requirements and you have the need to change the ffmpeg command, you can use a custom commandline processor instead of a built in encode processor. Using this method, you will still have all progress information being displayed in the "Job Monitor".

    This describes how you get to the internally built ffmpeg command from a processor so you can use it as a starting point in your workflow.
    • First, enable loggin in the "Special" settings of your workflow:
    extract_ffmpeg_cmd.png
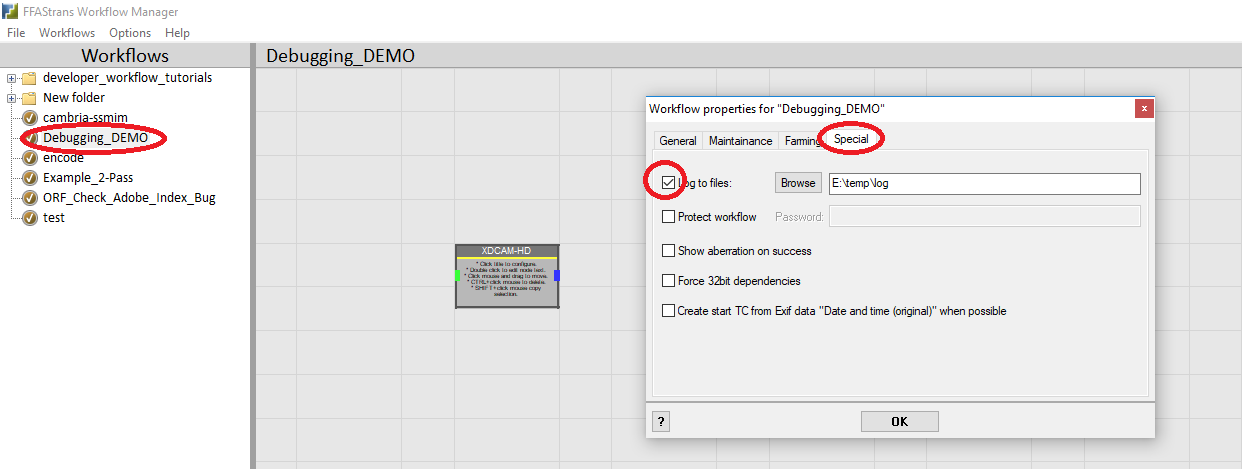
    extract_ffmpeg_cmd.png (40.94 KiB) Viewed 21698 times
    • Then, submit a file to your workflow and after it, open the generated log file
    • There are many ffmpeg commands in the log, the ones of interest should have the word "creation_time=now". If you search for it, you might find something like this:

    Code: Select all

    "C:\Users\emcodem\Downloads\FFAStrans0.9.4\Processors\FFMpeg\x64\ffmpeg.exe"  -analyzeduration 33554432  -i "E:\AudioFirstFrameTestVistek.mxf" -f lavfi -i aevalsrc=0 -f lavfi -i color=color=black:size=1920x1080 -shortest  -map_metadata -1  -map 0:0  -filter_complex "[0:1]pan=1|c0=c0[a1],[0:2]pan=1|c0=c0[a2],[0:3]pan=1|c0=c0[a3],[0:4]pan=1|c0=c0[a4],[a1]amerge=1[astr1],[a2]amerge=1[astr2],[a3]amerge=1[astr3],[a4]amerge=1[astr4]" -map "[astr1]"  -c:a pcm_s24le -ar 48000 -map "[astr2]"  -c:a pcm_s24le -ar 48000 -map "[astr3]"  -c:a pcm_s24le -ar 48000 -map "[astr4]"  -c:a pcm_s24le -ar 48000  -vf copy,colorspace=fast=1:all=bt709:format=yuv422p:ispace=bt709:itrc=bt709:iprimaries=bt709,fps=25,setfield=tff,setdar=dar=16/9,setsar=sar=1 -timecode 00:00:00:00 -c:v mpeg2video -r 25 -pix_fmt yuv422p -aspect 16:9 -intra_vlc 1 -b:v 50000000  -minrate 50000000 -maxrate 50000000 -bufsize 17825792 -rc_init_occupancy 17825792 -bf 2  -non_linear_quant 1 -seq_disp_ext 1 -video_format component -color_range 1 -color_primaries 1 -color_trc 1 -colorspace 1 -chroma_sample_location topleft -signal_standard 4 -dc 8 -qmin 3 -qmax 28 -g 12 -field_order tt -top 1 -flags +ildct+ilme -alternate_scan 1 -intra_matrix 8,10,22,27,29,37,37,40,9,12,14,28,29,37,39,40,9,14,27,31,34,37,40,48,12,22,27,29,34,37,40,58,26,27,29,34,37,38,48,58,26,27,29,36,38,38,48,69,18,27,34,36,38,38,48,69,26,26,34,34,38,40,58,79 -inter_matrix 16,20,22,26,28,32,32,36,18,20,22,28,28,32,34,36,18,22,26,30,30,32,36,38,20,22,26,28,30,32,36,42,24,26,28,30,32,34,38,40,24,26,28,32,34,34,38,42,24,26,30,32,34,34,38,42,24,24,30,30,34,36,40,44 -f mxf -max_muxing_queue_size 125 -metadata creation_time=now -y "E:\.ffastrans_work_root\20190219110537\20190319105353\20190319-105524-939-1DB12D418A10\~20190319-105527-511-A63ED0198A05.mxf"
    • Now, when we want to use this in a commandline processor, all you ned to do is to wrap it into the double quotes of this: cmd /C ""
    • The good thing about this is that all audio mapping should be done independently of the audio configuration of the source file.
    • The bad thing is that depending on your source file, ffastrans will generate lots of video filters. You probably want to start by removing the -vf part of the generated ffmpeg command.
    As an example, the above ffmpeg command in a commandline processor would look like this:

    Code: Select all

    cmd /C ""%s_ffmpeg%"  -analyzeduration 33554432  -i "%s_source%" -f lavfi -i aevalsrc=0 -f lavfi -i color=color=black:size=1920x1080 -shortest  -map_metadata -1  -map 0:0  -filter_complex "[0:1]pan=1|c0=c0[a1],[0:2]pan=1|c0=c0[a2],[0:3]pan=1|c0=c0[a3],[0:4]pan=1|c0=c0[a4],[a1]amerge=1[astr1],[a2]amerge=1[astr2],[a3]amerge=1[astr3],[a4]amerge=1[astr4]" -map "[astr1]"  -c:a pcm_s24le -ar 48000 -map "[astr2]"  -c:a pcm_s24le -ar 48000 -map "[astr3]"  -c:a pcm_s24le -ar 48000 -map "[astr4]"  -c:a pcm_s24le -ar 48000  -vf copy,colorspace=fast=1:all=bt709:format=yuv422p:ispace=bt709:itrc=bt709:iprimaries=bt709,fps=25,setfield=tff,setdar=dar=16/9,setsar=sar=1 -timecode 00:00:00:00 -c:v mpeg2video -r 25 -pix_fmt yuv422p -aspect 16:9 -intra_vlc 1 -b:v 50000000  -minrate 50000000 -maxrate 50000000 -bufsize 17825792 -rc_init_occupancy 17825792 -bf 2  -non_linear_quant 1 -seq_disp_ext 1 -video_format component -color_range 1 -color_primaries 1 -color_trc 1 -colorspace 1 -chroma_sample_location topleft -signal_standard 4 -dc 8 -qmin 3 -qmax 28 -g 12 -field_order tt -top 1 -flags +ildct+ilme -alternate_scan 1 -intra_matrix 8,10,22,27,29,37,37,40,9,12,14,28,29,37,39,40,9,14,27,31,34,37,40,48,12,22,27,29,34,37,40,58,26,27,29,34,37,38,48,58,26,27,29,36,38,38,48,69,18,27,34,36,38,38,48,69,26,26,34,34,38,40,58,79 -inter_matrix 16,20,22,26,28,32,32,36,18,20,22,28,28,32,34,36,18,22,26,30,30,32,36,38,20,22,26,28,30,32,36,42,24,26,28,30,32,34,38,40,24,26,28,32,34,34,38,42,24,26,30,32,34,34,38,42,24,24,30,30,34,36,40,44 -f mxf -max_muxing_queue_size 125 -metadata creation_time=now -y "%s_original_path%\%s_original_name%_encoded.mxf""
    Points of special interest:
    • The whole command is wrapped into the "" of cmd /C ""
    • Path and name of ffmpeg.exe has been replaced by "%s_ffmpeg%"
    • Path and name of source file (-i) has been replaced by "%s_source%"
    • Path and name of output file has been replaced by "%s_original_path%\%s_original_name%_encoded.mxf"
    emcodem, wrapping since 2009 you got the rhyme?
    emcodem
    Posts: 1643
    Joined: Wed Sep 19, 2018 8:11 am

    Re: Collection thread of learning/example workflows for beginners

    Post by emcodem »

    Simple Loudness Mono and Stereo example Workflows:
    LOUDNESS_STEREO_12_TO_XDCAM_2.xml
    (13.87 KiB) Downloaded 522 times
    LOUDNESS_MONO_12_TO_XDCAM.xml
    (15.71 KiB) Downloaded 463 times
    emcodem, wrapping since 2009 you got the rhyme?
    Post Reply